"My iTunes library has been filling up fast with movies and TV shows, and as a result it's taking up more and more space on the small hard drive in my computer. Is there any way to store those iTunes files to my External Hard Disk ? "

Transferring your iTunes library to external hard drive is a good idea to free up space on your hard drive, or to protect your library in case of data loss. But you should make sure your external hard drive has enough space for storing your entire library and keep your files organized with ratings, playcounts, and other metadata. Here is a detailed tutorial about how to backup iTunes library to External Hard Disk.
Step-by-step Guide to Back up iTunes Library to External HD
Part 1: Consolidate iTunes Library
First, be sure that all of your items in your library are in one place.
If you choose to consolidate your iTunes library, iTunes will locate all music and videos on your computer and add it automatically, making the iTunes consolidation process much faster than manually adding music and movies into one location.
1. Find iTunes Advanced Preferences:
Mac  : "Choose iTunes -> Preferences -> Advanced". Check the option "Copy files to iTunes Media folder when adding to library" and then click OK.
Windows  : "Choose iTunes Menu -> Preferences -> Advanced". Check the option "Copy files to iTunes Media folder when adding to library" and then click OK.
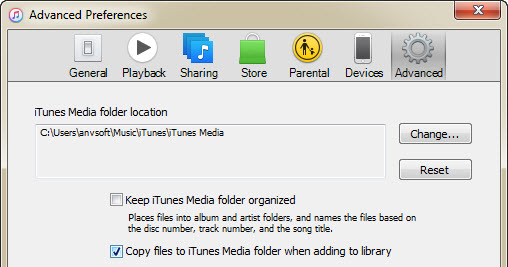
Note: When you check this option and add files to iTunes, iTunes places copies of the originals in the iTunes Media folder. The original files are left in their original locations.
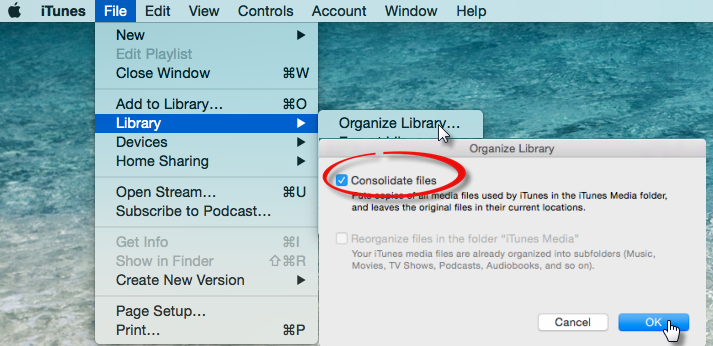
2. Select The Option to "Consolidate Files."
Choose File -> Library -> Organize Library. It would pop up a window and then select the option to “Consolidate files” and click OK. It would take just a few seconds.
If you originally did not have the option to copy files enabled, iTunes will copy files outside of the iTunes Media folder from their original locations to the iTunes Media folder. To save space on your hard disk, you might want to delete the original files after confirming they have been moved and are backed up.
Part 2:Copy iTunes Library to Your External Hard Drive
After completed these steps, your iTunes library files are all in one place and are ready to be backed up to your external hard drive.
1. Quit iTunes.
2. Locate your external drive.
Mac: On the desktop or Finder sidebar.
Windows: In “My Computer”.
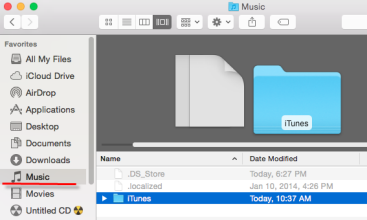
3. Locate your iTunes folder:
By default, the iTunes folder is located in:
Mac OS X: /Users/username/Music
Windows XP: \Documents and Settings\username\My Documents\My Music\
Windows Vista: \Users\username\Music\
Windows 7 or 8 or 10: \Users\username\My Music\
If the iTunes folder is not in the default location listed above, you can find the iTunes folder by following these steps:
- Step 1. Open iTunes Preferences:
- Step 2. The location of your iTunes folder will be listed in the "iTunes Media folder location" box.
Mac : “Choose iTunes -> Preferences -> Advanced"
Windows : “Choose iTunes Menu -> Preferences-> Advanced".

4. Drag the iTunes folder to your external hard drive. This will begin the iTunes backup. The amount of time the backup will take depends on the size of your library. When the transfer is done, your backup is complete and your external hard drive can be disconnected.
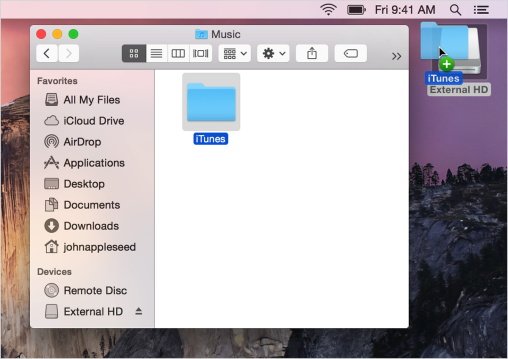
5. After the transfer process is complete, your iTunes library has been successfully transferred to your external hard drive.
How to Enjoy iTunes Videos from External Hard Disk ?
Now you know how to offload your entire iTunes Library to an external drive. However, those iTunes videos purchased and rented from iTunes Store are protected by DRM and can only be played with iTunes. In order to enjoy those iTunes videos from External Hard Disk, we should unlock DRM limitation from isTunes videos and convert them to unprotected videos format before transferring them to your External Hard Disk. M4VGear DRM Media Converter is such an innovative tool as it easily allows one to strip the DRM videos downloaded from iTunes and make them DRM-free.
Main Features of M4VGear DRM Media Converter:
If you are interested in giving M4VGear app a try, then you can download this product from download center. If you would like to purchase, then the app is available at a discounted price of $44.95 here.
M4VGear for Mac
 M4VGear for Windows

M4VGear for Windows
No comments:
Post a Comment